On 20 September 2013 I blogged about the first stage of my Fibre To The Premises (FTTP) broadband installation. Yesterday, 15 October, the second stage of the installation took place, and I’m posting this using my new fibre connection.
The BT Openreach engineer was due to visit sometime between 8am and 1pm. Since I am up early most days, I made sure that the room where the equipment was to be installed (two boxes attached to the wall) was clear, and furniture moved out of the way. The engineer called at about 8.15am to say that he was 15 minutes away – really great to get advance notice.
To cut a long story short, he had to drill a hole through an extremely thick (90cm) solid granite wall, which he managed very well considering how difficult a task that is. He fitted the equipment to the wall where I wanted it and ran the fibre cable through the hole and outside to the Consumer Splice Point (CSP).
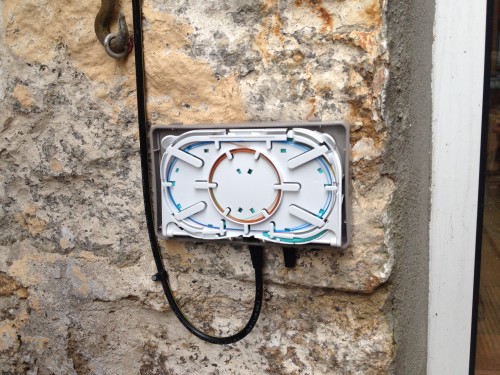
Here’s the CSP opened showing the run of fibre carefully coiled ready to be spliced with the short run that will go into the house:
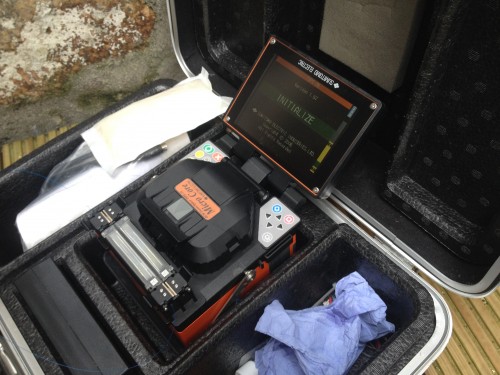
Next, some of this spare fibre was carefully cut using a splice tool to ensure a clean, flat cut. It was then cleaned with alcohol. The other end of the cable going into the house was prepared in the same way. The engineer opened a flight case revealing the impressively named “Fusion Splicer” which uses a short burst of electricity to fuse the glass fibres together.
Here’s the fusion splicer. It uses a digital microscope to help align the fibres perfectly. You can just about make out the faint blue fibres (which are incredibly thin) on the mid and lower left of the photo:
And here’s my fibre, fused and ready to go:

And here’s the Openreach VDSL modem and battery backup attached to the wall the other side of the CSP:

As soon as the fibre was spliced, the connection light on the VDSL modem lit up, and technically, it was online. The engineer carefully wound the excess cable back into the CSP, and the job was done. We connected up the BT HomeHub 3 and checked the connection via ethernet, which worked perfectly.
A quick speed test via the BT Wholesale Speed Test came in at 96Mbs down, and about 8Mbs up. The engineer assured me that this would increase as the connection stabilised.
He finished late morning and for the rest of the day the connection speed resolutely dropped to about 50Mbs/9Mbs wired straight in.
However, this morning the speed was a different picture:

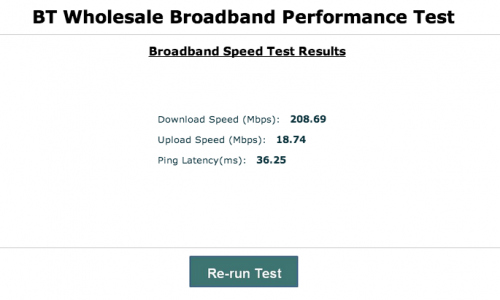
Success! And a lot faster than the advertised 160Mbs service that I’m paying for.
But a word of warning – as soon as you start to use wifi, watch the speeds drop away. There are so many factors that can affect your connection. I decided to remove the HomeHub from the equation and use my 2nd generation Apple Time Capsule to handle the wifi and connection via PPPoE. However, it seems that the WAN port, despite it being a gigabit port, can’t negotiate above 100Mbs (and yes, I’ve checked the cable using PPPoE directly on my laptop which revealed the speeds above). I may have to go back to the HomeHub and use the Time Capsule in bridge mode again.
Wifi and internal cabling aside, the FTTP connection was a complete success. The time I had to wait between the first and second appointments was rather long, but I suppose we’re only in the early days of the fibre rollout, and more engineers will need to be trained up.
All-in-all, my installation took about 10 hours to complete over the two days. I’d advise you to be in for the first visit, no matter what BT say! The connection is now phenomenally fast, and it’s one of those rare moments when you find yourself saying that the wait was worth it. I just uploaded an 11MB photo to Flickr in just a few seconds – this would have taken 3-4 minutes just two days ago. My network attached storage (NAS) is suddenly a lot more capable, allowing me to log in remotely to retrieve files without an agonising wait. Not to mention HD streaming. All at the same time if we want to.
If you’re thinking about ordering fibre broadband, don’t hesitate. Not long until I can remove the copper wires altogether!
Comments
4 responses to “My Fibre to the Premises (FTTP) Installation – Part 2”
Nice diary of the install Tom. Very informative and detailed.
Glad you found it interesting!
Brilliant account of what actually happens during an FTTP installation. I’m looking to try and see if I can liaise with Openreach to do some of the civil works for mine when they enable the cab (not due until next year). Although I’m still waiting for a response; you’re right in that having a decent network connection really makes the difference when you’re working from home a lot. Glad to see it was well worth the wait for you!
Hi Barry,
Thanks – glad you found it useful. The connection has been rock solid and using connections elsewhere makes me realise just how good it is. As you’d expect the upstream speed makes the biggest difference. I’m taking part in a network performance trial which reports that my average speed in the last week (I’m paying for 160MBs/20Mbs) was 191MBs/20.7Mbs. Not too shabby, as they say.
I hope that the time passes quickly, or things speed up for you!